RHEL and Palette eXtended Kubernetes
You can create a custom VMware vSphere RHEL image with Palette eXtended Kubernetes (PXK) and use it to deploy a Kubernetes cluster. You can choose to build the custom RHEL image with PXK using FIPS or opt for a non-FIPS-compliant image. This workflow is built on-top of the Image Builder project. Check out the Image Builder vSphere section of the documentation to learn more about this workflow.
Use the following steps to build a custom RHEL image with PXK for VMware vSphere and deploy a Kubernetes cluster.
Prerequisites
Before you begin, ensure that you have the following prerequisites met.
-
Access to the VMware vSphere environment, including user credentials allowing you to create virtual machines.
-
A valid RHEL subscription. You will need to provide the username and password for the subscription during the build process.
-
An x86_64 Linux VM with the following resources:
- 4 CPU
- 8 GB of RAM
- 100 GB of free disk space
- Internet access
- Git installed.
- Ubuntu 22.04 LTS or later.
infoYou may choose to use a different Linux distribution, but the commands in this guide are specific to Ubuntu.
-
The Linux VM must have connectivity to the internet and the VMware vSphere environment.
-
Access to the Red Hat Developer Portal.
Build Custom Image
Use the following steps to build a custom RHEL image with PXK for VMware vSphere. Select the tab based on whether you want to create a FIPS-compliant image or a non-FIPS-compliant image.
- FIPS
- Non-FIPS
-
Open a terminal session and log in to the Linux VM.
-
Download the x86_64 RHEL ISO from the Red Hat Developer Portal. Make sure you download the x86_64 DVD ISO and not the x86_64 BOOT ISO. This guide will use RHEL 8.8 as an example.
tipUse the direct link to download the RHEL ISO locally through either
curlorwget. -
Update the system and install the latest packages.
sudo apt update --yes && sudo apt upgrade --yes -
Install HashiCorp Packer.
wget -O- https://apt.releases.hashicorp.com/gpg | sudo gpg --dearmor -o /usr/share/keyrings/hashicorp-archive-keyring.gpg
echo "deb [signed-by=/usr/share/keyrings/hashicorp-archive-keyring.gpg] https://apt.releases.hashicorp.com $(lsb_release -cs) main" | sudo tee /etc/apt/sources.list.d/hashicorp.list
sudo apt update && sudo apt install packer -
Install
ansible,make,jq,unzip, andpython3.sudo apt-get install --yes make unzip jq python3-pip git && \
sudo apt install --yes software-properties-common
sudo add-apt-repository --yes --update ppa:ansible/ansible
sudo apt install --yes ansible -
Update the PATH environment variable to include Python. Make sure Python 3.10 or later is installed. Otherwise, you will encounter an error during the build process.
export PATH=$PATH:/usr/bin/python3 && \
echo "export PATH=$PATH:/usr/bin/python3" >> ~/.bashrc -
Clone the forked Image Builder that contains customizations for PXK and switch to the
rhel-pxk-fipsbranch.git clone https://github.com/spectrocloud/image-builder.git
cd image-builder/images/capi
git checkout rhel-pxk-fips -
Install the VMware and vSphere Packer plugins.
packer plugins install github.com/hashicorp/vmware
packer plugins install github.com/hashicorp/vsphere -
Prepare the image build by downloading dependencies needed by the image-builder scripts.
make deps-ovatipIf you encounter an error during the
make deps-ovacommand, ensure you set the python3 path in the PATH environment variable correctly. Also, make sure Python 3.10 or later is installed -
Update the packer/ova/rhel-8.json file and provide the path to the RHEL ISO image and the SHA256 checksum. Below is an example using RHEL 8.8. The ISO in this example is located at /home/ubuntu/rhel-isos/.
"iso_checksum": "517abcc67ee3b7212f57e180f5d30be3e8269e7a99e127a3399b7935c7e00a09",
"iso_checksum_type": "sha256",
"iso_url": "file:///home/ubuntu/rhel-isos/rhel-8.8-x86_64-dvd.iso",tipIf you are unable to find the SHA256 checksum for the RHEL ISO, you can calculate it using the following command. Replace
/path/to/isowith the path to the RHEL ISO you downloaded.sha256sum /path/to/iso -
Update the packer/ova/vsphere.json file with all the required vSphere details. Use the table below to learn more about each required field.
Field Name Description clusterThe name of the vSphere cluster where the Packer VM will be created. datacenterThe name of the vSphere datacenter where the Packer VM will be created. datastoreThe name of the vSphere datastore the Packer VM will use. folderThe name of the vSphere folder where the vSphere template will be created. insecure_connectionSet to trueif you are using a self-signed certificate for vCenter.networkThe name of the vSphere network the Packer VM will use. passwordThe password for the vSphere user. resource_poolThe name of the vSphere resource pool the Packer VM will use. usernameThe username for the vSphere user. vcenter_serverThe IP address or FQDN of the vCenter server. {
"cluster": "",
"convert_to_template": "false",
"create_snapshot": "true",
"datacenter": "",
"datastore": "",
"folder": "",
"insecure_connection": "false",
"linked_clone": "true",
"network": "",
"password": "",
"resource_pool": "",
"template": "",
"username": "",
"vcenter_server": ""
}Below is an example of a filled out packer/ova/vsphere.json file.
{
  "cluster": "Cluster2",
  "convert_to_template": "false",
  "create_snapshot": "true",
  "datacenter": "Datacenter",
  "datastore": "vsanDatastore2",
  "folder": "sp-docs",
  "insecure_connection": "true",
  "linked_clone": "true",
  "network": "VM-NETWORK-1",
  "password": "*************",
  "resource_pool": "rp-docs",
  "template": "",
  "username": "example@vsphere.local",
  "vcenter_server": "example.vcenter.dev"
} -
If you want to change the default Kubernetes version, modify the packer/config/kubernetes.json file. The following properties can be modified:
Field Name Description kubernetes_rpm_versionThe version of the Kubernetes RPM to install. kubernetes_semverThe Kubernetes version in semver format. kubernetes_seriesThe Kubernetes series. FIPS Components
We maintain custom RPM repositories that are used to download FIPS compliant packages and images during the build. The following properties are already set to download FIPS RPM packages and images.
"kubernetes_container_registry": "gcr.io/spectro-images-fips",
"kubernetes_rpm_gpg_key": "http://fips-rpms.spectrocloud.com/spectro_repo/gpg.key",
"kubernetes_rpm_repo": "http://fips-rpms.spectrocloud.com/spectro_repo/",
In this guide, the Kubernetes version is set to
1.27.11."kubernetes_rpm_version": "1.27.11",
"kubernetes_semver": "v1.27.11",
"kubernetes_series": "v1.27"warningThe Kubernetes version you specify must be available in Palette. You must also select the version specified when creating a cluster profile that uses the custom image.
-
Build the RHEL image with PXK. Replace
RHSM_USERandRHSM_PASSwith your Red Hat subscription username and password. The build may take up to an hour to complete depending on your environment.PACKER_FLAGS=-on-error=ask RHSM_USER=xxxxxxx RHSM_PASS=xxxxxxxxxxxx make build-node-ova-vsphere-rhel-8tipYou can set the RHEL credentials as environment variables to avoid providing them every time you issue the command.
export RHSM_USER=xxxxxxx
export RHSM_PASS=xxxxxxxxxxxx
Upon completion, the following output is displayed. Make sure to note the name of the image.
==> vsphere-iso.vsphere (shell-local): Running local shell script: /tmp/packer-shell3103701471
Build 'vsphere-iso.vsphere' finished after 31 minutes 15 seconds.

==> Wait completed after 31 minutes 15 seconds

==> Builds finished. The artifacts of successful builds are:
--> vsphere-iso.vsphere: rhel-8-kube-v1.27.11
--> vsphere-iso.vsphere: rhel-8-kube-v1.27.11
--> vsphere-iso.vsphere: rhel-8-kube-v1.27.11
--> vsphere-iso.vsphere: rhel-8-kube-v1.27.11 -
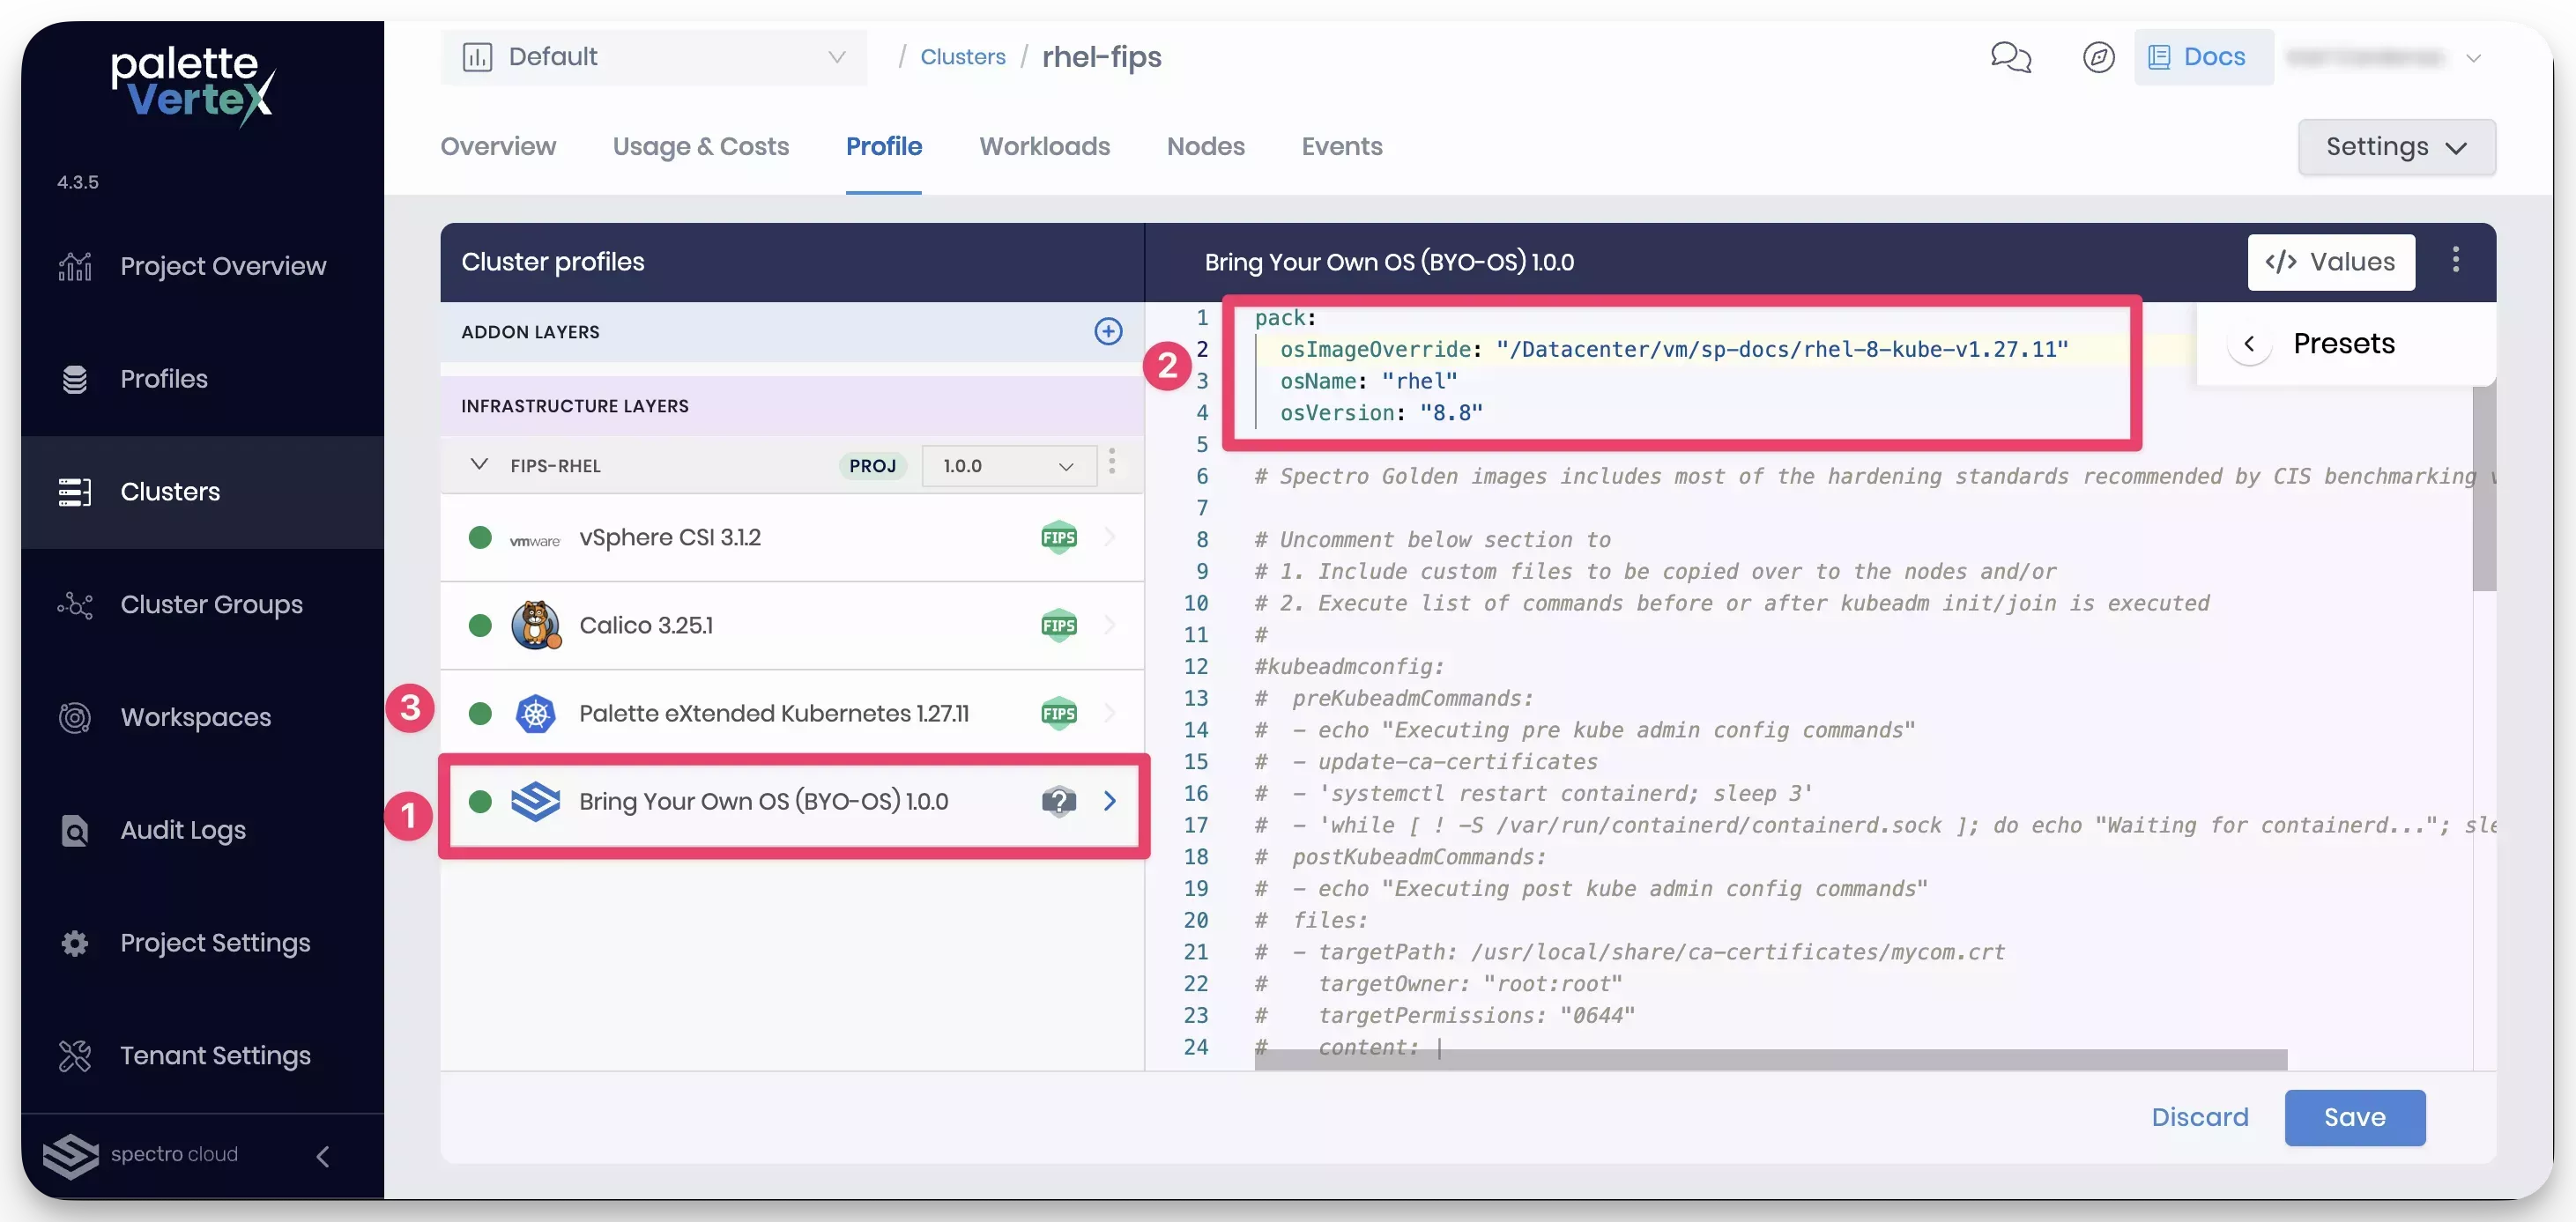
The custom RHEL image with PXK is now built and available in the VMware vSphere environment. You can use this image to deploy a Kubernetes cluster. To use the image, create a cluster profile with and select the BYOOS pack. Refer to the custom image in the cluster profile when populating the image details. You need to refer to the VM template path of the image.
pack:
  osImageOverride: "/Datacenter/vm/sp-docs/rhel-8-kube-v1.27.11"
  osName: "rhel"
  osVersion: "8.8"
Using the following image, take note of the three numbers highlighted in the image name.
- The BYOOS pack is selected as the operating system layer.
- The custom RHEL image template is specified in the
osImageOverridefield. - The Kubernetes version is set to
1.27.11, the same version specified in thekubernetes.jsonfile.
Complete the remaining steps in the cluster profile creation process. Use the cluster profile to deploy a Kubernetes cluster in your VMware vSphere environment with the custom RHEL image.
-
Open a terminal session and log in to the Linux VM.
-
Download the x86_64 RHEL ISO from the Red Hat Developer Portal. Make sure you download the x86_64 DVD ISO and not the x86_64 BOOT ISO. This guide will use RHEL 8.8 as an example.
tipUse the direct link to download the RHEL ISO locally through either
curlorwget. -
Update the system and install the latest packages.
sudo apt update --yes && sudo apt upgrade --yes -
Install HashiCorp Packer.
wget -O- https://apt.releases.hashicorp.com/gpg | sudo gpg --dearmor -o /usr/share/keyrings/hashicorp-archive-keyring.gpg
echo "deb [signed-by=/usr/share/keyrings/hashicorp-archive-keyring.gpg] https://apt.releases.hashicorp.com $(lsb_release -cs) main" | sudo tee /etc/apt/sources.list.d/hashicorp.list
sudo apt update && sudo apt install packer -
Install
ansible,make,jq,unzip, andpython3.sudo apt-get install --yes make unzip jq python3-pip git && \
sudo apt install --yes software-properties-common
sudo add-apt-repository --yes --update ppa:ansible/ansible
sudo apt install --yes ansible -
Update the PATH environment variable to include Python. Make sure Python 3.10 or later is installed. Otherwise, you will encounter an error during the build process.
export PATH=$PATH:/usr/bin/python3 && \
echo "export PATH=$PATH:/usr/bin/python3" >> ~/.bashrc -
Clone the Image Builder repository.
 git clone https://github.com/kubernetes-sigs/image-builder.git
cd image-builder/images/capi -
Install the VMware and vSphere Packer plugins.
packer plugins install github.com/hashicorp/vmware
packer plugins install github.com/hashicorp/vsphere -
Prepare the image build by downloading dependencies needed by the image-builder scripts.
make deps-ovatipIf you encounter an error during the
make deps-ovacommand, ensure you set the python3 path in the PATH environment variable correctly. Also, make sure Python 3.10 or later is installed. -
Update the packer/ova/rhel-8.json file and provide the path to the RHEL ISO image and the SHA256 checksum. Below is an example using RHEL 8.8. The ISO in this example is located at /home/ubuntu/rhel-isos/.
"iso_checksum": "517abcc67ee3b7212f57e180f5d30be3e8269e7a99e127a3399b7935c7e00a09",
"iso_checksum_type": "sha256",
"iso_url": "file:///home/ubuntu/rhel-isos/rhel-8.8-x86_64-dvd.iso",tipIf you are unable to find the SHA256 checksum for the RHEL ISO, you can calculate it using the following command. Replace
/path/to/isowith the path to the RHEL ISO you downloaded.sha256sum /path/to/iso -
Update the packer/ova/vsphere.json file with all the required vSphere details. Use the table below to learn more about each required field.
Field Name Description clusterThe name of the vSphere cluster where the Packer VM will be created. datacenterThe name of the vSphere datacenter where the Packer VM will be created. datastoreThe name of the vSphere datastore the Packer VM will use. folderThe name of the vSphere folder where the vSphere template will be created. insecure_connectionSet to trueif you are using a self-signed certificate for vCenter.networkThe name of the vSphere network the Packer VM will use. passwordThe password for the vSphere user. resource_poolThe name of the vSphere resource pool the Packer VM will use. usernameThe username for the vSphere user. vcenter_serverThe IP address or FQDN of the vCenter server. {
"cluster": "",
"convert_to_template": "false",
"create_snapshot": "true",
"datacenter": "",
"datastore": "",
"folder": "",
"insecure_connection": "false",
"linked_clone": "true",
"network": "",
"password": "",
"resource_pool": "",
"template": "",
"username": "",
"vcenter_server": ""
}Below is an example of a filled out packer/ova/vsphere.json file.
{
  "cluster": "Cluster2",
  "convert_to_template": "false",
  "create_snapshot": "true",
  "datacenter": "Datacenter",
  "datastore": "vsanDatastore2",
  "folder": "sp-docs",
  "insecure_connection": "true",
  "linked_clone": "true",
  "network": "VM-NETWORK-1",
  "password": "*************",
  "resource_pool": "rp-docs",
  "template": "",
  "username": "example@vsphere.local",
  "vcenter_server": "example.vcenter.dev"
} -
If you want to change the default Kubernetes version, modify the packer/config/kubernetes.json file. The following properties can be modified:
Field Name Description kubernetes_rpm_versionThe version of the Kubernetes RPM to install. kubernetes_semverThe Kubernetes version in semver format. kubernetes_seriesThe Kubernetes series. In this guide, the Kubernetes version is set to
1.27.11."kubernetes_rpm_version": "1.27.11",
"kubernetes_semver": "v1.27.11",
"kubernetes_series": "v1.27"warningThe Kubernetes version you specify must be available in Palette. You must also select the version specified when creating a cluster profile that uses the custom image.
-
Build the RHEL image with PXK. Replace
RHSM_USERandRHSM_PASSwith your Red Hat subscription username and password. The build may take up to an hour to complete depending on your environment.PACKER_FLAGS=-on-error=ask RHSM_USER=xxxxxxx RHSM_PASS=xxxxxxxxxxxx make build-node-ova-vsphere-rhel-8tipYou can set the RHEL credentials as environment variables to avoid providing them every time you issue the command.
export RHSM_USER=xxxxxxx
export RHSM_PASS=xxxxxxxxxxxx
Upon completion, the following output is displayed. Make sure to note the name of the image.
==> vsphere-iso.vsphere (shell-local): Running local shell script: /tmp/packer-shell3103701471
Build 'vsphere-iso.vsphere' finished after 31 minutes 15 seconds.

==> Wait completed after 31 minutes 15 seconds

==> Builds finished. The artifacts of successful builds are:
--> vsphere-iso.vsphere: rhel-8-kube-v1.27.11
--> vsphere-iso.vsphere: rhel-8-kube-v1.27.11
--> vsphere-iso.vsphere: rhel-8-kube-v1.27.11
--> vsphere-iso.vsphere: rhel-8-kube-v1.27.11 -
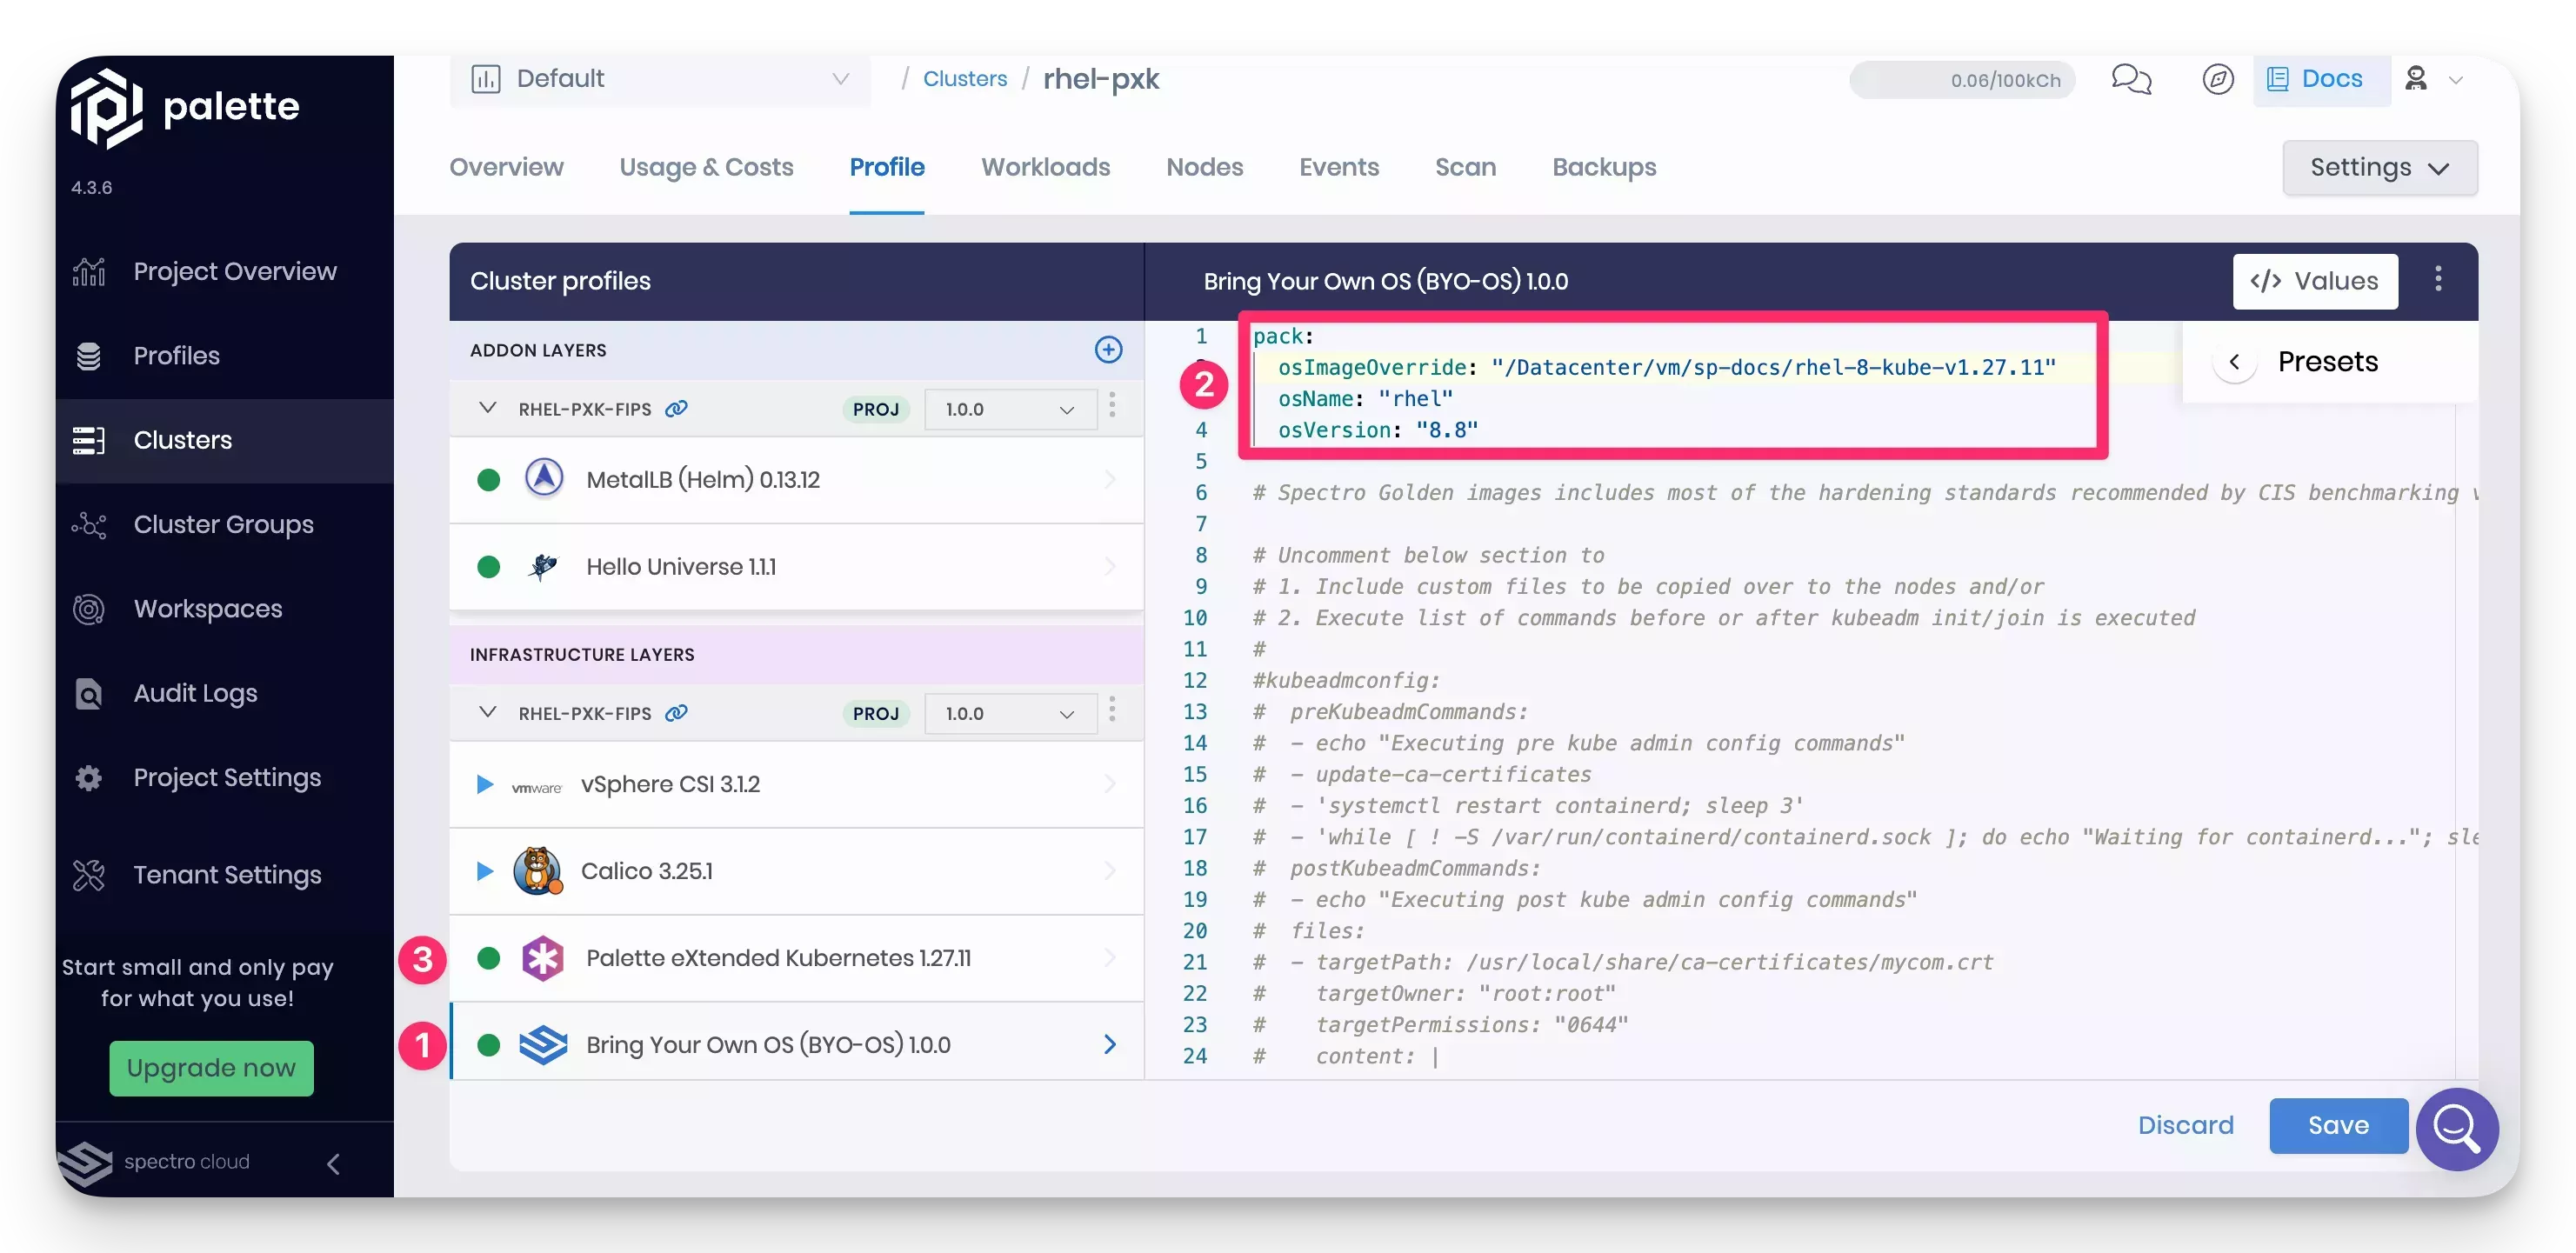
The custom RHEL image with PXK is now built and available in the VMware vSphere environment. You can use this image to deploy a Kubernetes cluster. To use the image, create a cluster profile with and select the BYOOS pack. Refer to the custom image in the cluster profile when populating the image details. You need to refer to the VM template path of the image.
pack:
  osImageOverride: "/Datacenter/vm/sp-docs/rhel-8-kube-v1.27.11"
  osName: "rhel"
  osVersion: "8.8"
Using the following image, take note of the three numbers highlighted in the image name.
- The BYOOS pack is selected as the operating system layer.
- The custom RHEL image template is specified in the
osImageOverridefield. - The Kubernetes version is set to
1.27.11, the same version specified in thekubernetes.jsonfile.
Complete the remaining steps in the cluster profile creation process. Use the cluster profile to deploy a Kubernetes cluster in your VMware vSphere environment with the custom RHEL image.
Validate
-
Log in to the VMware vSphere environment and navigate to the Inventory view.
-
Select the VMs and Templates tab and verify the custom RHEL image with PXK is available.
You can verify the FIPS mode is enabled on the custom RHEL image by SSH in to a cluster node and issuing the following
commands. Use the SSH key provided during the cluster creation process to log in to the node. The default user is
spectro.
cat /proc/sys/crypto/fips_enabled
If the output is 1, then FIPS mode is enabled. If the output is 0, the FIPS mode is disabled.
1
Next, verify the kernel command line arguments to ensure FIPS is enabled.
cat /proc/cmdline
Verify fips=1 is present in the output.
[iBOOT_IMAGE=(hd0,msdos1)/boot/vmlinuz-4.18.0-513.24.1.el8_9.x86_64 root=UUID=a0672ca4-19fb-45ae-8f15-5a9d0218644d ro crashkernel=auto fips=1]